App-Specific Switching in Windows

I was recently asked if there was any way to switch to a specific app in Windows using a short key sequence. The person in question was well aware of the ALT-TAB feature in Windows, but didn’t want to have to step through the list of running programs; he just wanted a short key sequence that would take him directly to the desired program without even having to look at the screen. As it turns out, this is easy to accomplish with a bit of help from PTFB Pro:

  1. Make sure the app you want to target is currently running
  2. Create an empty screen macro; just choose “Screen Macro” from the New Macro button on PTFB’s main, then immediately tap the Pause/Break key on your keyboard to stop recording.
  3. Double-click on your new macro to open it for editing, and give it a suitable name. On the Triggers page, turn OFF the “Trigger spontaneously” option and tick the hotkey trigger option, choosing a memorable hotkey that doesn’t interfere with anything else, e.g. for my favorite text editor I might use CTRL+SHIFT+T.
  4. Finally, on the Editing page add a new “Switch to prog” item (it’s at the bottom of the Misc section on the left) and choose your target app from the drop-down list. Now save all your changes by pressing “OK” in the Switch To dialog and in the macro properties dialog below it.

That’s all there is to it. From now on, whenever your target app is running your can summon it to the front instantly by using your chosen hotkey.


Removing the Windows 10 upgrade nag

As Windows 10 approaches its first release, Microsoft has begun pushing eligible Win7 users to “reserve their upgrade”. Admittedly the little nag is subtle – a white Windows icon in the system tray – but it’s a persistent little thing.

Win10Nag

Windows Vista, 7 and up will automatically hide other system tray icons unless you explicitly tell it not to, but it leaves this one alone. And if you use the Customize Notification Area Options screen to hide it – as most online advice tells you to do – it’ll just come right back the next time you boot your PC. That’s right; Windows’ own method for getting rid of annoying tray icons does not work (permanently) on the Windows 10 nag.

Yes it’s a small thing, but I don’t like it, and getting rid of it is easy with PTFB Pro, as follows.

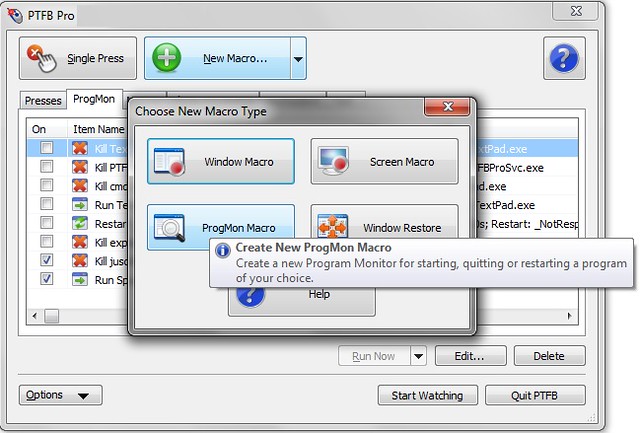
Step 1: Open up PTFB Pro and create a new ProgMon Macro

ProgMon

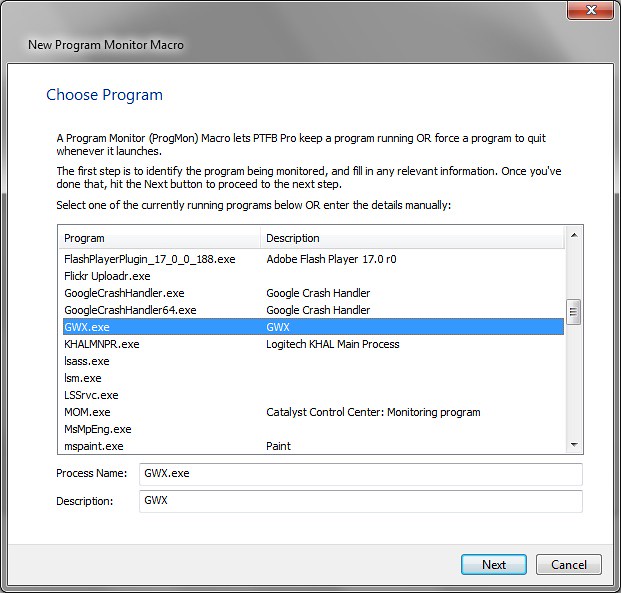
Step 2: Scroll down and select the “GWX.exe” process. That’s the little critter behind the Windows 10 nag icon. Click Next once you’ve got it selected.

ProgMon2

Step 3: Choose the action, which in this case is “Force the program to exit”. Click Next once more and choose the method of execution; “Request Quit” will do just fine but if you’re feeling vindictive you can use “Forced Exit”. Click Finish, and you’re done.

ProgMon4

As soon as you put PTFB Pro to work by clicking Start Watching, the Windows 10 nag is history. As long as PTFB Pro is running (and you can set it to autostart on boot) you’ll never see that nag again. And it’s no great loss, because if you’re like me, you’re only going to install Windows 10 on an a work computer when two crucial criteria are met:

  • Windows 10 has been out long enough to have the huge list of initial bugs and driver problems corrected by patches and maybe service pack 1
  • There’s an option to do a clean install, because upgrade install just never go well

That’s just one small way in which PTFB Pro can get rid of daily nuisances in Windows. Once you’ve tried PTFB Pro you’ll wonder how you ever managed without it, and you can try it free for 30 days here:

http://www.ptfbpro.com/download.shtml

Faster form-filling

I was recently asked how to create a macro to take the pain out of typing in your name, address, phone and so on; the kind of thing you have to do when signing up to just about anything online, and when entering online competitions. This is an easy thing to do with PTFB Pro, but before you continue, head over to our download page and make sure you’ve got the latest version: (http://www.ptfbpro.com/download.shtml)

OK, here’s the how-to:

  • Open some app that lets you type in the text you want (Notepad would do, or the next form you have to fill in) and get ready to type
  • Open PTFB Pro and create a screen-based macro (NOT a window macro) and type your text. Hit the break key when you’re done
  • During the recording, take care not to carry out any app-specific actions. For example, if you want to type your name in one field, your address in the next and so on, then use the TAB key to move between fields rather than the mouse.

When you’ve finished, open up the macro, switch to the Triggers page and:

  • turn off spontaneous triggering
  • define a hotkey (key combo) that you can use to trigger the macro whenever you need it


Find out more about saving time and finger-wear with PTFB Pro’s macros.
CLICK HERE to download a free 30 day trial, no strings attached. If you aren’t entirely happy simply uninstall!


How to Automate Repetitive Tasks

Do you have an editing task that perform over and over again, like pasting the URL of a photo into your blog and surrounding it with style tags? PTFB Pro can collapse all those operations into a simple hotkey sequence.

How to do it …

  1. Open up PTFB Pro’s main window by clicking on its tray icon
  2. Click on “New Macro…” and choose “Screen Macro”
  3. The macro starts recording immediately, so perform the editing operations you want to automate. For example, type the opening tags to apply the styles for the embedded material, then type CTRL+V to paste the contents of the clipboard, then type the closing tags and hit the Pause/Break key to stop macro recording.
  4. Double-click on your new macro in PTFB Pro’s main window to open it for editing. Switch to the Triggers page and untick “Trigger Spontaneously”. Now tick “Hotkey” and choose the key sequence you want to use to run the macro. Pick something that’s easy to remember that doesn’t get used for anything else. How about CTRL + SHIFT + I (I for insert)?

Find out more about boosting your productivity with autoclicks and macros.
CLICK HERE to download a free 30 day trial, no strings attached. If you aren’t entirely happy simply uninstall!

Access common windows functions by hotkey

I bet there are some Windows operations you perform regularly like flushing Internet Explorer’s cache, visiting the Add/Remove programs screen (aka “Programs & Features” in Windows 7), changing folder options, tweaking the firewall’s whitelist etc. Using PTFB Pro’s macro recorder you can get access to some of these functions a whole lot faster than you might think.

Here’s an example. Let’s say you want to flush IE’s cache of temporary files:

  1. Create a screen based macro in PTFB Pro, and quit recording immediately by hitting the Pause/Break key.  That’s right – you’re not going to simply record the action of going to the Start Menu, selecting Internet Options in the control panel and digging through IE’s screens. There’s a faster way!
  2. Open the macro you’ve just created. Give it a meaningful name on the first page, then switch to the Triggers page. Turn off “Trigger spontaneously” and click on “Hotkey”. Choose the hotkey combo you want to use for this action, and switch to the Editing page.
  3. On the Editing page, delete any existing actions and add a “Run Executable” item. Type (or copy paste) the following line into the command line box: RunDll32.exe InetCpl.cpl,ClearMyTracksByProcess 8
  4. Click OK to save your changes and you’re done!

You can use the same technique for a lot of other operations, just by changing the command line you use in step #3. Below there’s a list of the more common ones on Windows 7, but a bit of Googling will no doubt find you more. Also, bear in mind that this can be just the starting point for much more powerful actions.  For example, you could define a macro that uses a RunDLL command to bring up a screen, then create another macro to carry out a specific operation on that screen, then create a third “wrapper” macro that runs both the other two in sequence in response to an entirely different hotkey.

Some more RunDLL command lines for Windows 7

Content Advisor
RunDll32.exe msrating.dll,RatingSetupUI

Control Panel
RunDll32.exe shell32.dll,Control_RunDLL

Date and Time Properties
RunDll32.exe shell32.dll,Control_RunDLL timedate.cpl

Display Settings
RunDll32.exe shell32.dll,Control_RunDLL desk.cpl

Device Manager
RunDll32.exe devmgr.dll DeviceManager_Execute

Folder Options – General
RunDll32.exe shell32.dll,Options_RunDLL 0

Folder Options – Search
RunDll32.exe shell32.dll,Options_RunDLL 2

Folder Options – View
RunDll32.exe shell32.dll,Options_RunDLL 7

Forgotten Password Wizard
RunDll32.exe keymgr.dll,PRShowSaveWizardExW

Flush IE’s Temporary Internet Files:
RunDll32.exe InetCpl.cpl,ClearMyTracksByProcess 8

Flush IE’s Cookies:
RunDll32.exe InetCpl.cpl,ClearMyTracksByProcess 2

Flush IE’s Browsing History:
RunDll32.exe InetCpl.cpl,ClearMyTracksByProcess 1

Flush IE’s Stored Form Data:
RunDll32.exe InetCpl.cpl,ClearMyTracksByProcess 16

Flush IE’s Stored Passwords:
RunDll32.exe InetCpl.cpl,ClearMyTracksByProcess 32

Full IE browsing cleanup:
RunDll32.exe InetCpl.cpl,ClearMyTracksByProcess 255

Full IE browsing cleanupfiles inc settings stored by Add-ons:
RunDll32.exe InetCpl.cpl,ClearMyTracksByProcess 4351

Hibernate
RunDll32.exe powrprof.dll,SetSuspendState

IE Favourites
Rundll32.exe shdocvw.dll,DoOrganizeFavDlg

Keyboard Properties
RunDll32.exe shell32.dll,Control_RunDLL main.cpl @1

Lock Screen
RunDll32.exe user32.dll,LockWorkStation

Mouse Button – Swap left button to function as right
Rundll32 User32.dll,SwapMouseButton

Mouse Properties Dialog Box
Rundll32 Shell32.dll,Control_RunDLL main.cpl @0,0

Map Network Drive Wizard
Rundll32 Shell32.dll,SHHelpShortcuts_RunDLL Connect

Network Connections
RunDll32.exe shell32.dll,Control_RunDLL ncpa.cpl

Open With Dialog Box
Rundll32 Shell32.dll,OpenAs_RunDLL Any_File-name.ext

Power Options
RunDll32.exe Shell32.dll,Control_RunDLL powercfg.cpl

Printer Management Folder
Rundll32 Shell32.dll,SHHelpShortcuts_RunDLL PrintersFolder

Programs & Features, aka Add/Remove programs
RunDll32.exe shell32.dll,Control_RunDLL appwiz.cpl,,0

Region and Language Options
Rundll32 Shell32.dll,Control_RunDLL Intl.cpl,,0

Safely Remove Hardware Dialog Box
Rundll32 Shell32.dll,Control_RunDLL HotPlug.dll

Sound Properties Dialog Box
Rundll32 Shell32.dll,Control_RunDLL Mmsys.cpl,,0

Stored Usernames and Passwords
RunDll32.exe keymgr.dll,KRShowKeyMgr

System Properties – Advanced
RunDll32.exe shell32.dll,Control_RunDLL sysdm.cpl

System Properties – Advanced
Rundll32 Shell32.dll,Control_RunDLL Sysdm.cpl,,3

Taskbar Properties
RunDll32.exe shell32.dll,Options_RunDLL 1

User Accounts
RunDll32.exe shell32.dll,Control_RunDLL nusrmgr.cpl

Unplug/Eject Hardware
RunDll32.exe shell32.dll,Control_RunDLL hotplug.dll

Windows Security Center
RunDll32.exe shell32.dll,Control_RunDLL wscui.cpl

Windows – About
RunDll32.exe SHELL32.DLL,ShellAboutW

Windows Firewall Options
RunDll32.exe shell32.dll,Control_RunDLL firewall.cpl

Windows Fonts Folder
Rundll32 Shell32.dll,SHHelpShortcuts_RunDLL FontsFolder

Find out more about boosting your productivity with autoclicks and macros.
CLICK HERE to download a free 30 day trial, no strings attached. If you aren’t entirely happy simply uninstall!

How to automate external editing in Adobe Lightroom

Neither Lightroom 2 nor version 3 directly support the use of plug-ins and filters in the way that Photoshop does. They do however support the use of “external” editor programs, and this has given plug-in providers a way to get their products working with Lightroom. Take Topaz Labs for example – they have an impressive range of plug-ins, including the almost miraculous “Denoise”, all of which  can be hooked up to Lightroom using a special “go-between” program they call tlfusionexpress. While this is all good news, the actual editing process is clunky, and it’s largely LR’s fault.

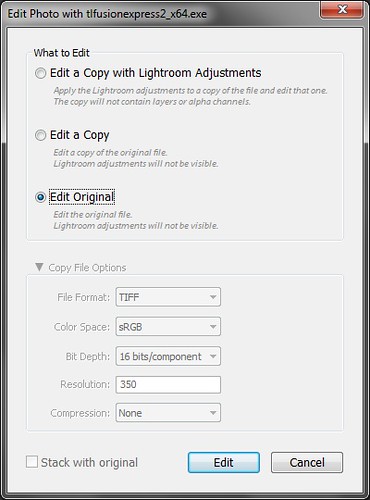
First you must hook the external editing program up to Lightroom via the External editing tab in the Preferences screen. This is a one-off operation so that’s OK, but thereafter every single time you start an edit via Photo -> Edit In, you get the following screen:

Lightroom external edit prompt

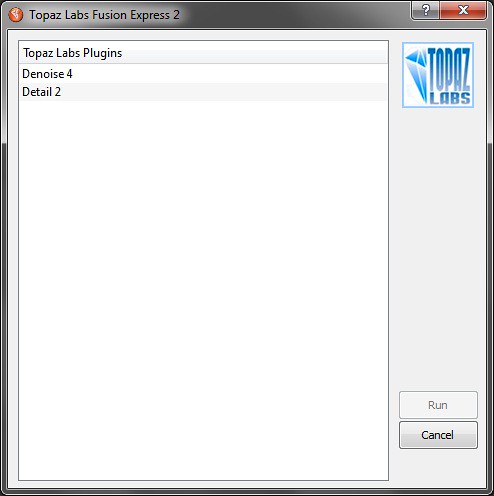
There’s no way to save your preferences and bypass this screen in future. That’s OK if you’re only using the external editor for the odd photo, but if you’re wanting to use it on a batch of 30 for example, it quickly becomes annoying. That’s not the end of it though, because there’s likely another screen coming up asking you which plug-in you want to use. Here’s the Topaz Labs version:

Topaz choose plugin

You have to do this every single time you edit a photo, and again there’s no way to indicate an automatic preference.

Lightroom is all about speeding up the post processing workflow, but these interruptions really slow you down and break your train of thought. The good news is that prompts like these are exactly what PTFB Pro was originally created for though, and it’s easy to eliminate them from the external editing process.

To deal with the first screen, pull up PTFB Pro’s main window, hit New macro and choose “New Window Macro”. Click on the Lightroom prompt to begin recording, and do exactly what you’d do in a normal edit session, i.e. choose the editing option you want and press “Edit”. At this point macro recording stops automatically and the macro is created and ready for use. You’ll never have to deal with that screen again.

Now we’re on to the next screen,  from Topaz Labs in our example. Again create a new Window Macro in PTFB Pro, choose the plug-in you want and hit “Run”. Now you’re never going to have to deal with that prompt again either.

If you want editing to proceed at maximum speed, you can edit the two macros you’ve just created and set their initial delays down to zero. On most PCs, the handling of the above two prompts will now happen so fast you’ll barely see them.

It doesn’t stop there though! You can go further with PTFB Pro if you want. For example, you could create one big macro that automatically initiates an external edit, deals with the above two prompts, and carries out the actual editing tasks you need. Tie it to a hotkey of your choosing, and you’ve collapsed a substantial amount of waiting, reading and clicking into a couple of short keystrokes.

Alternatively, you could build a macro that runs through a given number of repetitive editing tasks automatically without you even having to be at your computer. When I had a batch of over 40 photos that needed the Topaz Denoise treatment to look their best, I spent a couple of minutes creating a macro to apply the plug-in then advance to the next photo, and set it to run the required number of times. I then took the dogs for a relaxing walk, and when I came back the job was done!

Find out more about automating your workflow with Macros.
CLICK HERE to download a free 30 day trial, no strings attached. If you aren’t entirely happy simply uninstall!

How to automatically add tags in WordPress

When I’m writing a post in WordPress that contains photos, there are a lot of repetitive tasks. For example, just inserting a photo goes something like this:

  • copy the appropriate image URL from my Flickr page
  • switch back to WordPress’s HTML editing view my browser
  • type in all the opening formatting tags I want to use for each and every image
  • paste in the image URL
  • close all the tags

Since the clipboard can only hold one thing at a time, that adds up to a lot of repetitive typing, but I’ve cut almost all of it down to a couple of key strokes using PTFB Pro’s inbuilt macro recorder. Setting up the macro was straightforward – it boiled down to this:

  1. Record a macro that types the opening tags, uses CTRL+V to paste the contents of the clipboard, then types the closing tags and hits the return key
  2. Attach a memorable hotkey sequence to the macro to trigger it on demand.

As soon as I’d created the macro (step #1 above) I double-clicked it to make a couple of tweaks. On the Triggers page, I turned off the “Trigger spontaneously” option because I only want the macro to run when I tell it to. I then ticked the hotkey trigger, and chose the key sequence that would subsequently run the macro.

Trigger by hotkey

On this occasion I chose CTRL + SHIFT + I. Why? Well for me the “I” suggests “insert” and “image”, so it’s easy to remember, and combining it with CTRL and SHIFT together means that it’s very unlikely to clash with hotkeys used by any other software on my computer.

Now, pasting and formatting a photo in a WordPress post comes down to this:

  • copy the Flickr URL to the clipboard
  • switch to the WordPress HTML view
  • hit CTRL+SHIFT+I

That’s a lot less typing, and it frees me from having to remember the tags I want to use. I can write the post faster not only because of the time saved by typing less, but also because I can keep my concentration going on the content of the post rather than the editing process.

If I’d wanted I could have added more into the macro – for example I could have switched to the WordPress HTML view automatically. In this case I decided to keep it simple; I’ve found that unless I’m creating a throw-away macro for a huge one-off editing job it’s better to keep the macros small and clean. The same principle applies in writing software; keep each function small, self contained and free of side effects and they’re a lot easier to reuse!

Find out more about boosting your productivity with autoclicks and macros.
CLICK HERE to download a free 30 day trial, no strings attached. If you aren’t entirely happy simply uninstall!