New release – PTFB Pro v4.1.3

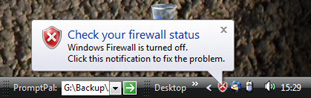
Ever since Windows XP, Microsoft has been taking steps to keep the system tray (also known as the task bar notification area) free of clutter. Its latest operating system – Windows 7 – now automatically hides system tray icons in less than one minute, often without warning. In fairness, Microsoft has at the same made it a little easier for knowledgeable users to permanently unhide icons they want to see all the time, like email icons, antivirus and of course, PTFB Pro. All you have to do is click on the little arrow by the system tray and drag the icon you want off the little popup window and back into the tray:

HiddenIcons

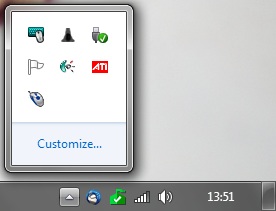
Click the arrow to see the icons that Windows 7 has hidden, then drag PTFB Pro’s mouse-like icon out of the popup window and back into the system tray..

System Tray

Now PTFB Pro’s icon will stay in view permanently!

This is fine for users that know about it, but I’m sure it confuses a lot of people. They see the icon one minute, and the next minute its gone, without any warning from Windows. Not very helpful, Microsoft!

To help counter this, the latest release of PTFB Pro can now live either solely as a system tray icon (like all the previous versions) or as a regular task bar button. On Windows 7 and Vista, this choice is now offered within the installer:

Minimize To Tray - Installer

Minimize To Tray Option In the Installer

It’s also available at any time via the “Minimize To Tray” entry in the Options menu within PTFB Pro itself:

MinimizeToTray


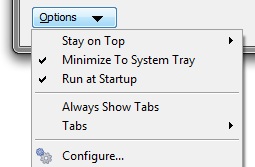
Hopefully this will help new users who aren’t familiar with Windows 7’s icon-hiding practices, whilst allowing more experienced users to run with PTFB Pro in its most discrete yet readily accessible form: the system tray icon.

Advanced Target Recognition – What it is and How to Use it!

Introduction

Windows 7 contains a new technology that enables PTFB Pro version 4.1 and onwards to find targets in non-standard screens and even some browsers. We’ve called this new feature “advanced target recognition”. It dramatically increases the power of the “single press” item, allowing it to auto-click on links in browsers like Internet Explorer and Firefox reliably even if the browser window is resized.

XP, Vista & Svr 2008

If you’re running PTFB Pro on an older operating system such as XP, Vista and Svr 2008 you can still take advantage of Advanced Target Recognition as follows:

  1. Download and install the latest version of PTFB Pro from our website: http://www.ptfbpro.com/download.shtml
  2. On PTFB Pro’s main screen, select Options -> About PTFB Pro. If you see the text “Advanced Target Recognition AVAILABLE” in the resulting About screen, you already in business; any new single press items you create will use advanced target recognition automatically.

  3. If the About screen said the new technology is unavailable, you need to install Microsoft’s “Platform Update for Windows Vista” via Windows Update. Don’t be put off by the name if you’re not running Vista – the update works for XP and Svr 2008 as well. It’ll most likely show up as an optional update, and also goes by the name of KB971513. Once it’s installed, revisit PTFB Pro’s About Screen to verify that is well, then you’re good to go!Get more information on the Platform Update for Windows Vista here:
    http://msdn.microsoft.com/en-us/library/ee663866%28VS.85%29.aspx

Using Advanced Target Recognition

Once Advanced Target Recognition is available, you don’t need to do anything special to use it; every new item you create will use it as appropriate. Single Press items get the most benefit, but macros and Window Restore items can also use it to help make sure that they’re acting on the right window. It really comes into its own if you want PTFB Pro to click a particular link on a page in Internet Explorer (v8 or later) and FireFox. It won’t help so much in other browsers as yet; at the time of writing, Opera and Google Chrome still aren’t exposing their pages using the new Microsoft technology.

Performance

While the new technology in Windows 7 and the platform update lets PTFB Pro “see” more, isn’t quite as fast as the older methods. To offset this PTFB Pro only uses the new tech when it really needs to. You can also help to keep performance high by making your new macro and single press items as specific as possible. For example, if your item operates on a particular program, go into the “Identifying the Target” page of the item properties and make sure you tick “Fire only if window belongs to program” and “Match Window Type”. Using these two settings allows PTFB Pro to narrow down its matches using the older technology, and only use the new stuff once it’s pretty sure it’s found the right target.

Enabling/Disabling Advanced Target Recognition

It’s highly unlikely you’ll ever need this, but there is an “off” switch for the new technology. You’ll find it on the first page of the configuration screen (Options -> Configure) :

As the option itself suggests, changes only take effect on new items. If you’ve already created some items that use the new tech, they’ll continue to use it even if you disable the option, but any new items you create will use the old technology exclusively.

How to tell if an item uses ATR

Go to the “snapshot” page of the item’s properties and look at the scrollable text box. Under the section titled “CHILD CONTROLS”, you’ll find a short introductory line of text. If it includes the words “standard windows children” then the item uses only the old technology; if instead you see “accessibility children” or “UI automation children” then it uses a mix of old and new technology to do its job.

How to Dismiss System Tray Notification “Balloons”

System tray balloons such as the one below were originally used as a way of alerting you without getting in the way of your current task.

Unfortunately, they can be an annoying distraction if they’re not carrying relevant information. For example if you temporarily turn off Windows’s inbuilt firewall to troubleshoot a network problem, you’ll get a balloon pointlessly telling you what you’ve just done. A battle of wills between you and the computer now ensues: can you ignore the balloon until it closes, or will you succumb and interrupt your troubleshooting to hit the balloon’s close box? Of course you could just disable such warnings completely, but that’s generally not a good idea.

Happily, PTFB Pro can now dismiss these tedious little attention seekers. Here’s how:

  1. When the balloon next appears, create a new single-press item (not a macro)
  2. Target the single press item on the balloon’s close box

The resulting item can be edited just like any other. You can for example set a trigger delay of 1 to 2 seconds so that you get to read the notification, but it closes before it becomes an irritation. The only difference is that on the General page of the item’s properties, the Action section now carries an explicit “Close Tooltip” option.

Find out more about boosting your productivity with autoclicks and macros.
CLICK HERE to download a free 30 day trial, no strings attached. If you aren’t entirely happy simply uninstall!

How to Share Macros Between Networked Computers

In office environments it may be desirable to have several installations of PTFB Pro loading their items from a single, shared file. That way, when one of more of those items need to change, only a single file need be updated.

PTFB Pro allows you to export a set of items to a special file held in a shared area, and tell all copies of PTFB Pro to load items from that file. Updates to the file can be picked up automatically if required. Each user is still free to create their own private items.

Here’s how …

    1. Export the items you wish to share to a separate file. This done through the “Export items to file” command in the Options menu, and produces a .ptfbx file which you should place in a suitable shared location.
    2. Next you have to tell all the other copies of PTFB Pro to load items from the .ptfbx file. This is most easily done in the “Shared File” page of PTFB Pro’s configuration screen.

First tick “Use shared file”, then either browse to the file or enter its path directly. Next, set the name of the tab which should receive the shared items. If desired, you can also set PTFB Pro to periodically check the nominated file for changes and reload it if required.

A few points to note about the shared file:

  • The items imported in this way are considered “on loan” and are therefore not editable, though you are free to duplicate them and edit the duplicates.
  • You can disable and even delete shared items, but if “Reload updates automatically” is set and the shared file is updated, the items will automatically revert to their original state.
  • The user is not limited to the shared items; they can create and modify their own items.

Find out more about boosting your productivity with autoclicks and macros.
CLICK HERE to download a free 30 day trial, no strings attached. If you aren’t entirely happy simply uninstall!

How to Automatically Restore Preferences any Time a Window/Program Opens

Some programs automatically restore the size and position of their window from the previous session, but many don’t. Even the ones that do, don’t always get it right – especially when running on Vista or Windows 7, or if you’ve got multiple monitors. You can fix this behavior using PTFB Pro as follows:

  1. Get your chosen program running and position its window exactly how you like it.

  2. Open up PTFB Pro’s main window

  3. Click on “New Macro…” and choose “Window Restore”

  4. Select the window in the resulting list, or if you prefer hit “Choose by Mouse” and click on the window with the hand-shaped mouse cursor. Click Next.

  5. Since the title is a key feature that PTFB Pro uses to recognize your window, take a moment to review the options on the next screen. When you’re happy with your choices, hit Next.

  6. Now tell PTFB Pro what actions to take on the window. You can choose to restore its current size and position, center it on the screen, maximize, minimize or restore it, and/or set it to stay on top of other windows. Hit Next when you’re done.

  7. Pick a title for your new macro and choose whether the actions should be carried out once when the window opens, or applied & reapplied repeatedly to prevent the window from moving or changing state.

You may wish to tweak your new macro’s settings after you’ve created it. For example, you might find that the restorative actions occur too quickly after the window has first appeared. If so, you can introduce a longer initial delay to give the window a little time to “settle” before it is resize/repositioned by PTFB Pro.

Find out more about boosting your productivity with autoclicks and macros.
CLICK HERE to download a free 30 day trial, no strings attached. If you aren’t entirely happy simply uninstall!

How to automatically restart a program when it becomes unresponsive

There’s a critical program on your system that has known memory leaks. It needs to be restarted on a regular basis to free up resources.

Another critical program occasionally hangs or goes into the ‘not responding’ state. It needs to be restarted quickly when this happens – even during the night when there’s no one on the premises.

How to do it …

  1. Open up PTFB Pro’s main window by clicking on its tray icon
  2. Click on “New Macro…” and choose “ProgMon Macro”
  3. Select the program in the resulting list and hit Next
  4. Choose “Restart the program ONLY if it is not responding” and set the frequency of the check (make this as long as you’re comfortable with). Hit Next
  5. The next page deals with how the program will be terminated when it has become unresponsive. By default, PTFB Pro choose “Forced Exit” and ticks “Only terminate program if it is not responding. Unless you have good reason to do otherwise, just hit Next to take these defaults.
  6. The final page deals with relaunching the program. Again, you can usually just take the defaults and hit “Finish” but if you want to make changes you can.

You may wish to tweak your new macro’s settings after you’ve created it. If so, just double-click on the new macro in PTFB Pro’s main window and work through its tabbed Properties screen.

Find out more about boosting your productivity with autoclicks and macros.
CLICK HERE to download a free 30 day trial, no strings attached. If you aren’t entirely happy simply uninstall!

How to Keep a program running that crashes without warning or error

An office computer has a utility that should be kept running throughout the day, and sometimes colleagues accidentally quit the utility. There’s another program you’d like to keep running, but sometimes it crashes out without any warning or error. These programs need to be restarted immediately.

How to do it …

  1. Open up PTFB Pro’s main window by clicking on its tray icon
  2. Click on “New Macro…” and choose “ProgMon Macro”
  3. Select the program in the resulting list and hit Next
  4. Choose “launch the program if it’s not running”
  5. PTFB Pro will suggest a command line to launch the program. In most cases this will do fine, but if you need to make changes or cause the program to run under a specific account, you can.
  6. When you’re done, hit Finish

You may wish to tweak your new macro’s settings after you’ve created it. By default a macro like this is set to run every second or so, but if you’re happy with PTFB Pro checking for the program say every ten minutes, you can change the repeat delay in the Triggers page.

Find out more about boosting your productivity with autoclicks and macros.
CLICK HERE to download a free 30 day trial, no strings attached. If you aren’t entirely happy simply uninstall!

How to Keep one Window/Program on top of others

Sometimes it’s useful to stop one program’s window from being hidden by others as you switch from one program to another in the cours eof your work. Some programs have an inbuilt facility for this, there are many more that don’t.

Here’s how to set a window to stay on top of others using PTFB Pro:

  1. Right-click on PTFB Pro’s tray icon and select “Stay on Top” from the resulting popup menu, OR hit the Options button in PTFB Pro’s main window and again select “Stay on Top” from the resulting popup menu.
  2. When you select “Stay on Top” a sub menu will open up. Just select your chosen window in that sub menu.
  3. The “stay on top” setting is toggled, so just repeat the process if you want to turn it off again.

Note that this version of Stay on Top is not maintained between sessions. In other words, if you close then re-open the window in question it will not have Stay on Top set. If you want to have Stay on Top active for a particular program/window all the time, you should use a Window Restore macro instead.

Find out more about boosting your productivity with autoclicks and macros.
CLICK HERE to download a free 30 day trial, no strings attached. If you aren’t entirely happy simply uninstall!

How to Automate Repetitive Tasks

Do you have an editing task that perform over and over again, like pasting the URL of a photo into your blog and surrounding it with style tags? PTFB Pro can collapse all those operations into a simple hotkey sequence.

How to do it …

  1. Open up PTFB Pro’s main window by clicking on its tray icon
  2. Click on “New Macro…” and choose “Screen Macro”
  3. The macro starts recording immediately, so perform the editing operations you want to automate. For example, type the opening tags to apply the styles for the embedded material, then type CTRL+V to paste the contents of the clipboard, then type the closing tags and hit the Pause/Break key to stop macro recording.
  4. Double-click on your new macro in PTFB Pro’s main window to open it for editing. Switch to the Triggers page and untick “Trigger Spontaneously”. Now tick “Hotkey” and choose the key sequence you want to use to run the macro. Pick something that’s easy to remember that doesn’t get used for anything else. How about CTRL + SHIFT + I (I for insert)?

Find out more about boosting your productivity with autoclicks and macros.
CLICK HERE to download a free 30 day trial, no strings attached. If you aren’t entirely happy simply uninstall!

How To Automatically Respond to Irritating Prompts and Popups

PTFB Pro’s auto-response feature can be used to help minimize the disruption and irritation caused by today’s attention-craving programs. Tell PTFB what buttons to press and when, and you’ll finally be free of your computer’s nagging requests to check for updates, to change your default browser, and to make sure it’s “OK” to do the very thing you’ve just told it to do. It is, in effect, a “don’t show this again” option for the many prompts and messages that don’t have one.

  • Automatically respond to confirmation requests.
  • Eliminate popups.
  • Auto-fill forms.
  • Quick & easy to use.

How to do it …

Next time an irritating dialog or confirmation screen appears :

  1. Open up PTFB Pro’s main window by clicking on its tray icon
  2. Click on “Single Press”. The cursor will now change to a hand with an outstretched finger.
  3. Move the cursor over the button you want to be pressed and click the mouse (If you want PTFB Pro to carry out a more complex task use the ‘macro’ option instead).
  4. That’s all there is to it!

Finally, put PTFB Pro to work by clicking “Start Watching”, or by pressing the close box in the top-right corner. PTFB Pro will minimize to the system tray and keep watch for offending windows and dialogs. When they appear it will handle them for you.When you record a new ‘single press’ (or macro) item, PTFB Pro stores information that uniquely identifies the window that you are acting upon. By default, PTFB Pro will run your new ‘single press’ (or macro) every time that window appears in the future. If you prefer, you can tell PTFB Pro to run your macro according to schedule, command line or even in response to a short cut key. You can also tweak a whole host of settings to fine tune your macro, and even configure the default behavior for newly created macros.

Find out more about boosting your productivity with autoclicks and macros.
CLICK HERE to download a free 30 day trial, no strings attached. If you aren’t entirely happy simply uninstall!